Project Overview
Some aspects of the project were more successful than others, due to the different traits of the parts we aimed to create. The first of the pots, which was done with SLA, looks quite good. The print parameters were clearly set right, no issues occurred during printing, and the support material left very little behind. However, one issue with it was the orientation, (see Fig 1a) which was chosen by the PreForm. Being a cup shape, a pool of liquid resin remained in the pot while it was printing. The inside of the pot was slightly tacky to the touch when completed, and we have concerns for the long-term health of a plant growing in a pot with this residue left in it. One solution would be to orient the pot upside-down while printing, but considering that good drainage is a priority when growing succulents, we believe a better approach would be to modify the design and add some drainage holes in the bottom of the pot. Also it has to be noted that the cost of SLA print was $27 with 9 hour printing time with lowest possible settings. This led to us explore FFF printers which lowered the cost to $2.70 per print with a 4 hour printing time.


Figure 1: a. SLA print with support clear resin. b. After removal of support.
Print time: 9 hours, cost $27.00


Figure 2: A completed SLA pot, including potted plant.
While SLA printing is most aesthetically pleasing, the cost and print time make it hard to produce the total 6 pots we intended. Going forward, we will turn to FFF printing to make the parts cheap yet functional. More consideration should also be put into the color, since the clear PLA does not have the same visual appeal as the SLA material.


Figure 3 . a. FFF print with clear PLA with support. b. After removal of support
Print time: 4 hours, cost $2.70
The legs turned out quite well, due to the ease with which their design could be printed. They were printed laying down, as shown in figure 4, and as a result they needed no support material and the surface finish turned out better than we expected from FFF as well. While this part is rather large, the design cuts down on print volume without making it too weak, making this a quick build. This suggests we should try to apply this same tactic to the rest of our parts, to the degree possible for each part.

Figure 4. One leg of the wheel, FFF printed using PLA. Print time: ~1.5 hr, cost $3.22
Unfortunately, we were not able to assemble the full wheel structure. In retrospect, this goal was slightly too ambitious and did not take into account the amount of refinement that each component part would require. We need to print more pots, and we should take an iterative design approach to those, instead of printing a full batch at once. Also, we made the wheel slightly too large to be printed in any of the 3D printers on campus. To address this oversight, we will begin by reducing its diameter, and also reducing the height of the pots as well to make sure they are able to clear the ground as the wheel rotates.
The one way clutch bearing turned out pretty good as well. Although the assembly was complex due to moving parts, designing with appropriate clearance between the inner race and the rollers made it feasible. The 3D printer’s ability to produce parts with tight tolerances also contributed towards the functionality. A significant advantage of printing the bearing was that we didn’t have to assemble any of the parts, as they came in assembled condition. The bearing was freely able to rotate in one direction and resist rotation in the opposite direction, as intended. The bearing didn’t require supports as it was laid flat on the printer bed. The material chosen was PLA and the overall assembly took 8.8 hours to complete and cost only 4.4$. There were some residual materials, which were removed using pliers and an Exacto knife. Although the surface wasn’t smooth, it didn’t distort the shape or movement of the bearing and it is to be expected.

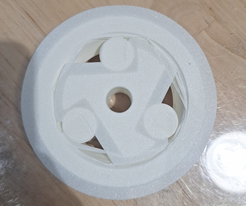

Figure 5. One way bearing, FFF printed using PLA. Print time: ~8.8 hr, cost $4.4
Non-Printed Components
This project includes a few parts that are not produced using additive manufacturing. The one that requires the most justification is the axle. While we theoretically could have printed it, we decided against this, as printing it in either orientation had issues for our purposes. Orienting it horizontally would require post-processing to get the underside clean enough for it to fit the tolerances we needed. Orienting it vertically would result in placing shear stress parallel to the layers, which would make it quite weak. Since the part we need is just a cylinder, additively manufacturing it would be introducing extra effort for an inferior end product. We found a piece of brass pipe and cut it to length (12 cm, as shown in Figure 5). The outer diameter of the pipe was 15.1 mm, making it ideal for a press fit (see Figure 6) into the 1.5 cm diameter holes meant for the axle in the bearings and legs.

Figure 6. The axle, with the pot for scale.
We filled the pot with potting soil intended for succulents and planted a sempervivum plant (refer back to Fig 2 & 6) in it. We chose this plant because they are a very hardy type of succulent and would allow us to include actual plants in our tests without constantly worrying about them dying. For now, we have a temporary pot holding the soil so that we can move the plant between printed pots without the mess of loose soil. We have more sempervivums growing in temporary pots so that we’ll be ready for when the rest of the pots are finished.
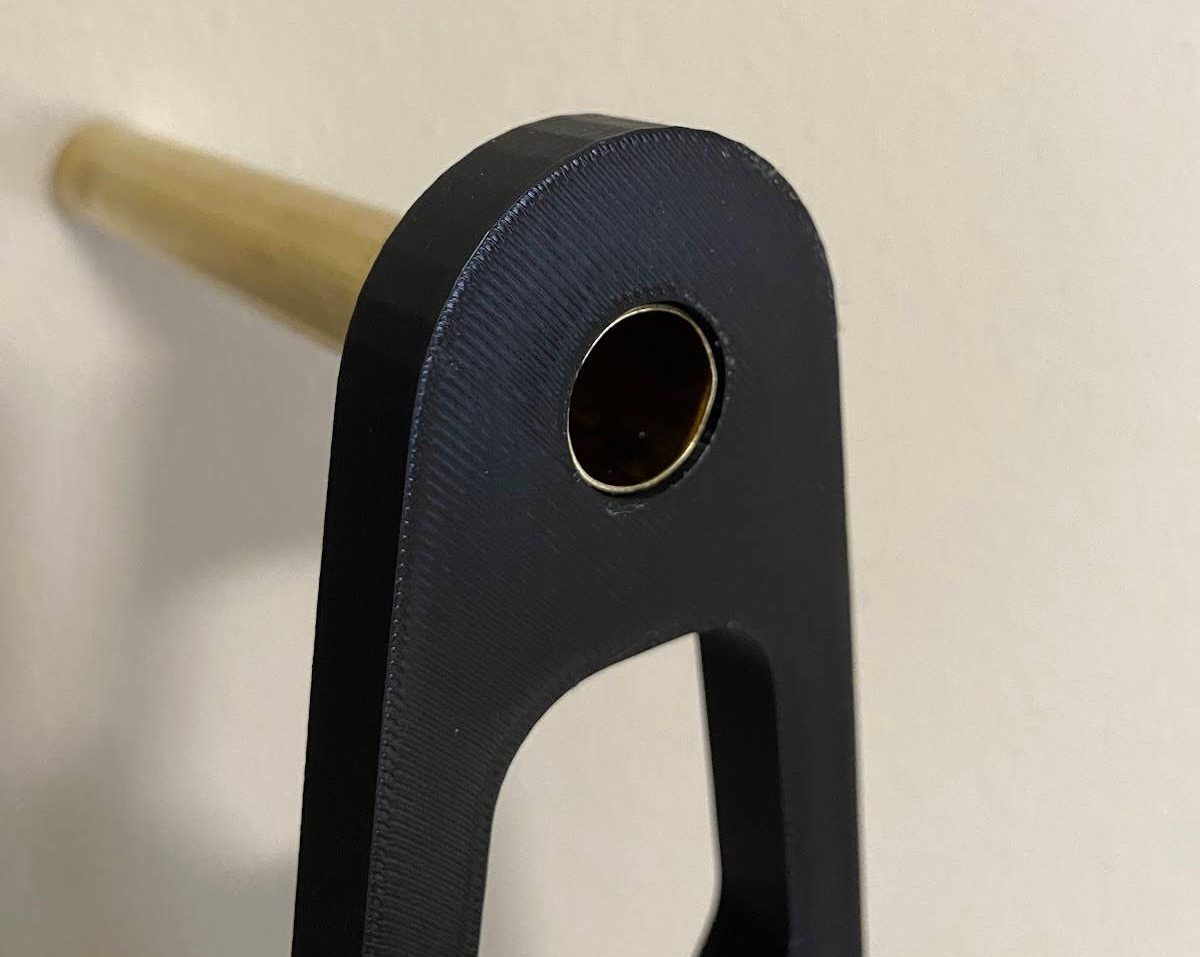
Figure 7. Demonstration of the press fit between the axle and the leg.
Key update takeaways
- Cost and Time: SLA print of the succulent pot was not only costly but time consuming. Therefore we switched to the FFF process, using Ultimaker clear PLA which cost half the time and 1/10th the cost.
- Scaling Wheel Design: To address size constraints, we will reduce the diameter of the wheel and adjust the height of the pots to ensure compatibility with the available 3D printers.
- Non-Printed Axle Solution: Instead of additively manufacturing the axle, we opted for a brass pipe cut to length, providing a suitable solution for assembly and functionality while avoiding the challenges associated with 3D printing this.
- Plant Selection and Preparation: Sempervivum plants were chosen for their resilience, allowing for practical testing without constant concern for plant health. Temporary pots are being used to facilitate plant movement until all printed pots are ready.